Table of Contents
- 17.1. Anatomy of NetBSD Logical Volume Manager
- 17.2. Install physical media
- 17.3. Configure Kernel Support
- 17.4. Disklabel each physical volume member of the LVM
- 17.5. Create Physical Volumes
- 17.6. Create Volume Group
- 17.7. Create Logical Volume
- 17.8. Example: LVM with Volume groups located on raid1
NetBSD LVM allows logical volume management on NetBSD systems, with a well known user interface, which is the same as the Linux LVM2 tools.
NetBSD LVM is built on Linux lvm2tools and libdevmapper, together with a BSD-licensed device-mapper kernel driver specially written for NetBSD.
The LVM driver allows the user to manage available disk space effectively and efficiently. Disk space from several disks, and partitions, known as “Physical Volumes”, can be added to “Volume Groups”, which is the pool of available disk space for “Logical Partitions” aka Logical Volumes.
Logical Volumes can be grown and shrunk at will using the LVM utilities.
The basic building block is the Physical Volume. This is a disk, or a part of a disk, which is used to store data.
Physical Volumes are aggregated together to make Volume Groups, or VGs. Typically, Volume Groups are used to aggregate storage for the same functional unit. Typical Volume Groups could thus be named “Audio”, “Multimedia” or “Documents”. By segregating storage requirements in this functional way, the same type of resilience and redundancy is applied to the whole of the functional unit.
The steps required to setup a LVM are as follows:
Install physical media
Configure kernel support
Configure system, install tools
-
Optional step
Disklabel each volume member of the LVM
Initialize the LVM disk devices
Create a volume group from initialized disks
Create Logical volume from created Volume group
Create a filesystem on the new LV device
Mount the LV filesystem
This example features a LVM setup on NetBSD/i386.
-
Volume Group
The Volume Group is a disk space pool from which the user creates Logical Volumes and to which Physical Volumes can be added. It is the basic administration unit of the NetBSD LVM implementation.
-
Physical Volume
A physical volume is the basic unit in a LVM structure. Every PV consists of small disk space chunks called Physical Extends. Every Volume Group must have at least one PV. A PV can be created on hard disks or hard disk like devices such as raid, ccd, or cgd device.
-
Logical Volume
The Logical Volume is a logical partition created from disk space assigned to the Volume Group. LV can be newfsed and mounted as any other pseudo-disk device. Lvm tools use functionality exported by the device-mapper driver in the kernel to create the LV.
-
Physical Extents
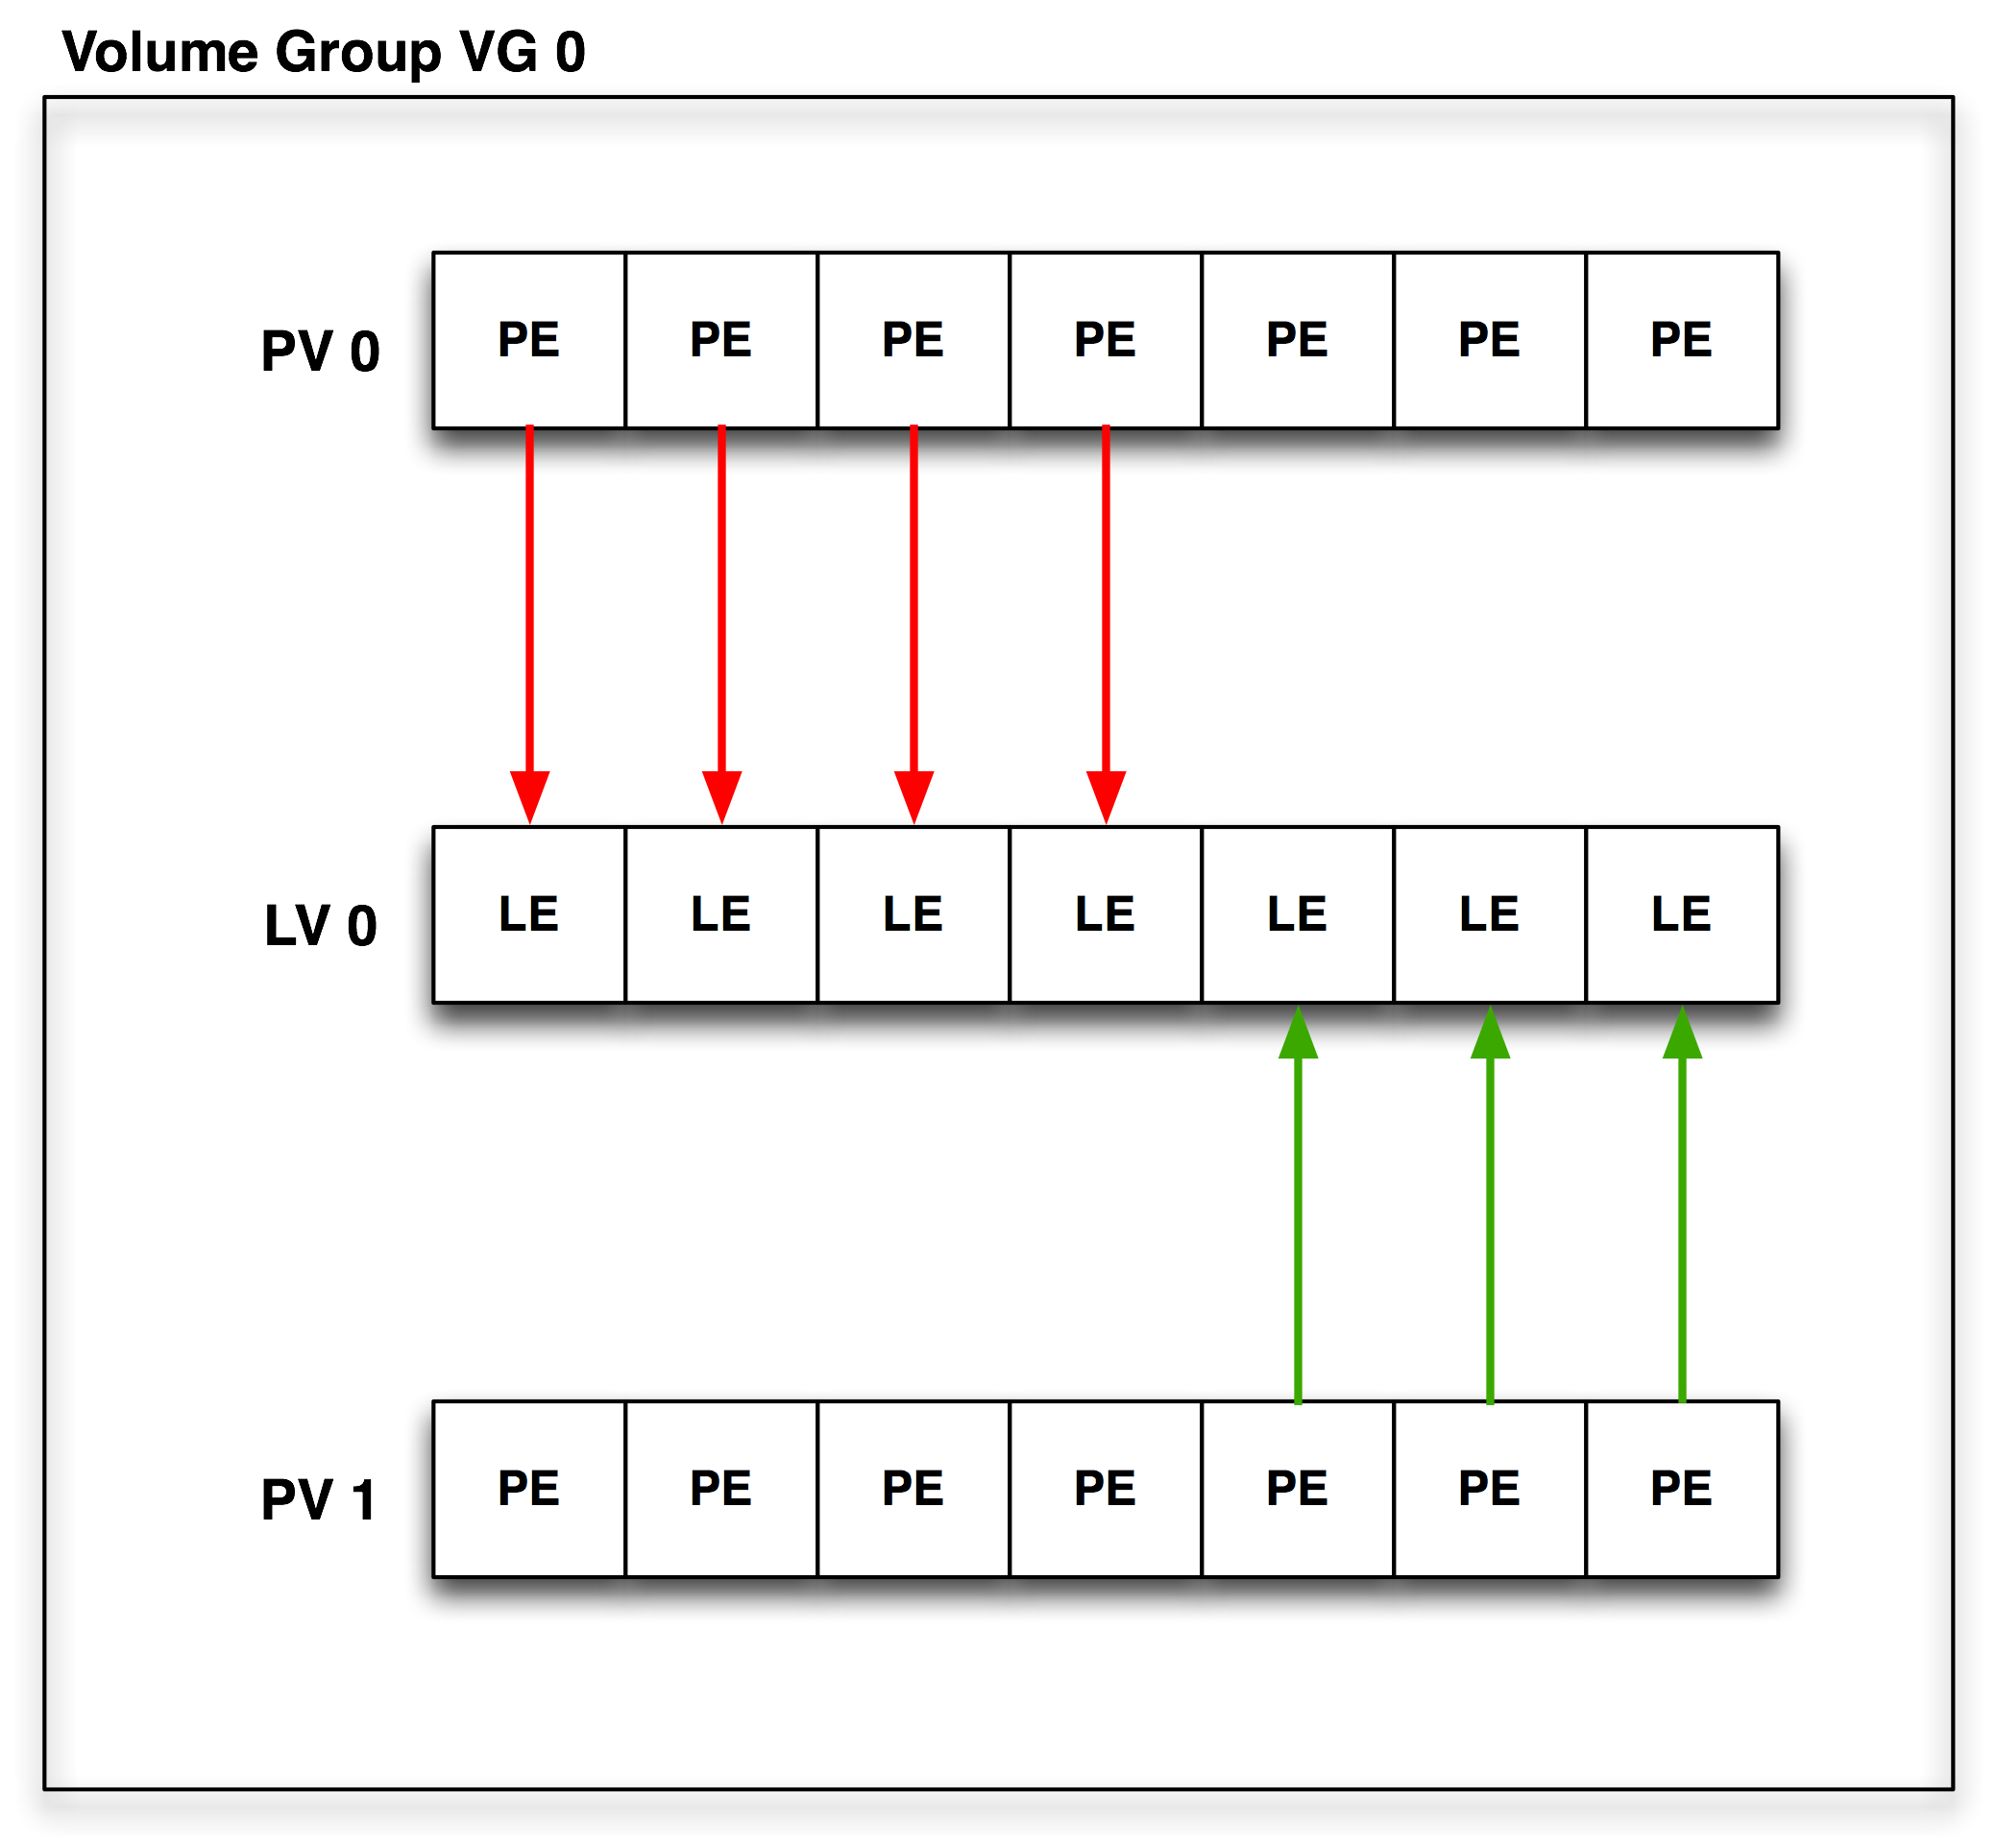
Each physical volume is divided chunks of disk space. The default size is 4MB. Every LV size is rounded by PE size. The LV is created by mapping Logical Extends in the LV to Physical extends in a Volume group.
-
Logical Extents
Each logical volume is split into chunks of disk space, known as logical extents. The extent size is the same for all logical volumes in the volume group.
-
Physical Extents mapping
Every LV consists of “LEs” mapped to “PEs” mapped by a target mapping. Currently, the following mappings are defined.
-
Linear Mapping
will linearly assign range of PEs to LEs.
For example it can map 100 PEs from PV 1 to LV 1 and another 100 PEs from PV 0. -
Stripe Mapping
will interleave the chunks of the logical extents across a number of physical volumes.
-
-
Snapshots
A facility provided by LVM is 'snapshots'. Whilst in standard NetBSD, the “fss” driver can be used to provide filesystem snapshots at a filesystem level, the snapshot facility in the LVM allows the administrator to create a logical block device which presents an exact copy of a logical volume, frozen at some point in time. This facility does require that the snapshot be made at a time when the data on the logical volume is in a consistent state.
Warning
Snapshot feature is not fully implemented in LVM in NetBSD and should not be used in production.
This step is at your own discretion, depending on your platform and the hardware at your disposal. LVM can be used with disklabel partitions or even with standard partitions created with fdisk.
From my “dmesg”:
Disk #1:
            probe(esp0:0:0): max sync rate 10.00MB/s
            sd0 at scsibus0 target 0 lun 0: <SEAGATE, ST32430N SUN2.1G, 0444> SCSI2 0/direct fixed
            sd0: 2049 MB, 3992 cyl, 9 head, 116 sec, 512 bytes/sect x 4197405 sectors

            Disk #2
            probe(esp0:1:0): max sync rate 10.00MB/s
            sd1 at scsibus0 target 1 lun 0: <SEAGATE, ST32430N SUN2.1G, 0444> SCSI2 0/direct fixed
            sd1: 2049 MB, 3992 cyl, 9 head, 116 sec, 512 bytes/sect x 4197405 sectors

            Disk #3
            probe(esp0:2:0): max sync rate 10.00MB/s
            sd2 at scsibus0 target 2 lun 0: <SEAGATE, ST11200N SUN1.05, 9500> SCSI2 0/direct fixed
            sd2: 1005 MB, 1872 cyl, 15 head, 73 sec, 512 bytes/sect x 2059140 sectors

            Disk #4
            probe(esp0:3:0): max sync rate 10.00MB/s
            sd3 at scsibus0 target 3 lun 0: <SEAGATE, ST11200N SUN1.05, 8808 > SCSI2 0
            sd3: 1005 MB, 1872 cyl, 15 head, 73 sec, 512 bytes/sect x 2059140 sectors
The following kernel configuration directive is needed to provide LVM device support. It is provided as a kernel module, so that no extra modifications need be made to a standard NetBSD kernel.
pseudo-device dm
If you do not want to rebuild your kernel only because of LVM support you can use dm kernel module. The devmapper kernel module can be loaded on your system. To get the current status of modules in the kernel, the modstat is used:
vm1# modstat
        NAME            CLASS   SOURCE  REFS    SIZE    REQUIRES
        cd9660          vfs     filesys 0       21442   -
        coredump        misc    filesys 1       2814    -
        exec_elf32      misc    filesys 0       6713    coredump
        exec_script     misc    filesys 0       1091    -
        ffs             vfs     boot    0       163040  -
        kernfs          vfs     filesys 0       10201   -
        ptyfs           vfs     filesys 0       7852    -
When the modload dm is issued, the dm kernel module will be loaded:
vm1# modstat
          NAME            CLASS   SOURCE  REFS    SIZE    REQUIRES
          cd9660          vfs     filesys 0       21442   -
          coredump        misc    filesys 1       2814    -
          dm              misc    filesys 0       14448   -
          exec_elf32      misc    filesys 0       6713    coredump
          exec_script     misc    filesys 0       1091    -
          ffs             vfs     boot    0       163040  -
          kernfs          vfs     filesys 0       10201   -
          ptyfs           vfs     filesys 0       7852    -
Each physical volume disk in LVM will need a special filesystem established. In this example, I will need to disklabel:
/dev/rsd0d
/dev/rsd1d
/dev/rsd2d
/dev/rsd3d
It should be borne in mind that it is possible to use the NetBSD vnd driver to make standard filesystem space appear in the system as a disk device.
Note
Always remember to disklabel the character device, not the block device, in
/dev/r{s,w}d*
Note
On all platforms except amd64 and i386 where the d partition is used for this,
the c slice is symbolic of the entire NetBSD partition and is
reserved.
You will probably want to remove any pre-existing disklabels on the physical volume disks in the LVM. This can be accomplished in one of two ways with the dd(1) command:
#dd if=/dev/zero of=/dev/rsd0d bs=8k count=1#dd if=/dev/zero of=/dev/rsd1d bs=8k count=1#dd if=/dev/zero of=/dev/rsd2d bs=8k count=1#dd if=/dev/zero of=/dev/rsd3d bs=8k count=1
If your port uses a MBR (Master Boot Record) to partition the disks so that the NetBSD partitions are only part of the overall disk, and other OSs like Windows or Linux use other parts, you can void the MBR and all partitions on disk by using the command:
#dd if=/dev/zero of=/dev/rsd0d bs=8k count=1#dd if=/dev/zero of=/dev/rsd1d bs=8k count=1#dd if=/dev/zero of=/dev/rsd2d bs=8k count=1#dd if=/dev/zero of=/dev/rsd3d bs=8k count=1
This will make all data on the entire disk inaccessible. Note that the entire disk is
slice d on i386 (and some other ports), and c
elsewhere (e.g. on sparc). See the “kern.rawpartition” sysctl - "3" means "d",
"2" means "c".
The default disklabel for the disk will look similar to this:
#disklabel -r sd0[...snip...] bytes/sector: 512 sectors/track: 63 tracks/cylinder: 16 sectors/cylinder: 1008 cylinders: 207 total sectors: 208896 rpm: 3600 interleave: 1 trackskew: 0 cylinderskew: 0 headswitch: 0 # microseconds track-to-track seek: 0 # microseconds drivedata: 0 4 partitions: # size offset fstype [fsize bsize cpg/sgs] a: 208896 0 4.2BSD 0 0 0 # (Cyl. 0 - 207*) d: 208896 0 unused 0 0 # (Cyl. 0 - 207*)
You will need to create one “slice” on the NetBSD partition of the disk that consumes the entire partition. The slice must begin at least two sectors after end of disklabel part of disk. On i386 it is sector “63”. Therefore, the “size” value should be “total sectors” minus 2x “sectors”. Edit your disklabel accordingly:
#disklabel -e sd0
Note
The offset of a slice of type “4.2BSD” must be a multiple of the “sectors” value.
Note
Be sure to export EDITOR=[path to your favorite editor] before editing the disklabels.
Note
The slice must be fstype 4.2BSD.
Because there will only be one slice on this partition, you can recycle the
d slice (normally reserved for symbolic uses). Change your disklabel to the
following:
3 partitions:
            #        size   offset    fstype   [fsize bsize   cpg]
            d:  4197403       65      4.2BSD                       # (Cyl. 1 - 4020*)
Optionally you can setup a slice other than d to use, simply adjust
accordingly below:
3 partitions:
            #        size   offset    fstype   [fsize bsize   cpg]
            a:  4197403       65      4.2BSD                       # (Cyl. 1 - 4020*)
            c:  4197405       0       unused     1024  8192        # (Cyl. 0 - 4020*)
Be sure to write the label when you have completed. Disklabel will object to your disklabel and prompt you to re-edit if it does not pass its sanity checks.
Once all disks are properly labeled, you will need to create physical volume on them. Every partition/disk added to LVM must have physical volume header on start of it. All informations, like Volume group where Physical volume belongs are stored in this header.
# lvm pvcreate /dev/rwd1[ad]
Status of physical volume can be viewed with pvdisplay command.
# lvm pvdisplay
Once all disks are properly labeled with physical volume header, volume group must be created from them. Volume Group is pool of PEs from which administrator can create Logical Volumes “partitions”.
# lvm vgcreate vg0 /dev/rwd1[ad]
vg0 is name of Volume Group
/dev/rwd1[ad] is Physical Volume
Volume group can be later extended/reduced with vgextend and vgreduce commands. These commands adds physical volumes to VG.
          # lvm vgextend vg0 /dev/rwd1[ad]

          # lvm vgreduce vg0 /dev/rwd1[ad]
Status of Volume group can be viewed with vgdisplay command.
# lvm vgdisplay vg0
Once Volume Group was created administrator can create “logical partitions” volumes.
# lvm lvcreate -L 20M -n lv1 vg0
vg0 is name of Volume Group
-L 20M is size of Logical Volume
-n lv1 is name of Logical Volume
Logical Volume can be later extended/reduced with lvextend and lvreduce commands.
          # lvm lvextend -L+20M /dev/vg0/lv1

          # lvm lvreduce -L-20M /dev/vg0/lv1
Note
To shrink the lv partition, you must first shrink the filesystem using resize_ffs(8) (which as of NetBSD 9.0 does not support shrinking of FFSv2 yet).
Status of Logical Volume can be viewed with lvdisplay command.
# lvm lvdisplay lv0/lv1
After reboot all functional LV's in defined Volume group can be activated with command
# lvm vgchange -a y
Motivation for using raid 1 disk as physical volume disk for Volume Group is disk reliability. With PV on raid 1 disk it is possible to use Logical Volumes even after disk failure.
Before we can start work with the LVM tools. We have to be sure that NetBSD dm driver was properly compiled into the kernel or loaded as a module. Easiest way how to find if we have dm driver available is run modstat. For more information see Configure Kernel Support chapter.
Following example raid configuration defined in Raid 1 configuration user will set up clean raid1 disk device. With 2 disks in a mirror mode.
Figure 17.2. Example raid 1 configuration
# vi /var/tmp/raid0.conf
START array
1 2 0

START disks
/dev/wd2a
/dev/wd1a

START layout
128 1 1 1

START queue
fifo 100#raidctl -v -C /var/tmp/raid0.conf raid0 raid0: Component /dev/wd1a being configured at col: 0 Column: 0 Num Columns: 0 Version: 0 Serial Number: 0 Mod Counter: 0 Clean: No Status: 0 Column out of alignment for: /dev/wd2a Number of columns do not match for: /dev/wd2a /dev/wd2a is not clean! raid0: Component /dev/wd1a being configured at col: 1 Column: 0 Num Columns: 0 Version: 0 Serial Number: 0 Mod Counter: 0 Clean: No Status: 0 Column out of alignment for: /dev/wd1a Number of columns do not match for: /dev/wd1a /dev/wd1a is not clean! raid0: There were fatal errors raid0: Fatal errors being ignored. raid0: RAID Level 1 raid0: Components: /dev/wd2a /dev/wd1a raid0: Total Sectors: 19540864 (9541 MB)#raidctl -v -I 2004082401 raid0#raidctl -v -i raid0 Initiating re-write of parity#tail -1 /var/log/messages raid0: Error re-writing parity!#raidctl -v -s raid0 Components: /dev/wd2a: optimal /dev/wd1a: optimal No spares. Component label for /dev/wd1a: Row: 0, Column: 1, Num Rows: 1, Num Columns: 2 Version: 2, Serial Number: 2004082401, Mod Counter: 7 Clean: No, Status: 0 sectPerSU: 128, SUsPerPU: 1, SUsPerRU: 1 Queue size: 100, blocksize: 512, numBlocks: 19540864 RAID Level: 1 Autoconfig: No Root partition: No Last configured as: raid0 Parity status: DIRTY Reconstruction is 100% complete. Parity Re-write is 100% complete. Copyback is 100% complete. Component label for /dev/wd2a: Row: 0, Column: 1, Num Rows: 1, Num Columns: 2 Version: 2, Serial Number: 2004082401, Mod Counter: 7 Clean: No, Status: 0 sectPerSU: 128, SUsPerPU: 1, SUsPerRU: 1 Queue size: 100, blocksize: 512, numBlocks: 19540864 RAID Level: 1 Autoconfig: No Root partition: No Last configured as: raid0 Parity status: DIRTY Reconstruction is 100% complete. Parity Re-write is 100% complete. Copyback is 100% complete.
After setting up raid we need to create disklabel on raid disk.
On i386:
 # disklabel -r -e -I raid0
type: RAID
disk: raid
label: fictitious
flags:
bytes/sector: 512
sectors/track: 128
tracks/cylinder: 8
sectors/cylinder: 1024
cylinders: 19082
total sectors: 19540864
rpm: 3600
interleave: 1
trackskew: 0
cylinderskew: 0
headswitch: 0 # microseconds
track-to-track seek: 0 # microseconds
drivedata: 0

#        size    offset     fstype [fsize bsize cpg/sgs]
a:  19540789        65     4.2BSD      0     0     0  # (Cyl.      0 - 18569)
d:  19540864         0     unused      0     0        # (Cyl.      0 - 19082*)
On sparc64:
# disklabel -r -e -I raid0
[...snip...]
total sectors: 19539968
[...snip...]
2 partitions:
#        size    offset     fstype [fsize bsize cpg/sgs]
a:  19540793        65     4.2BSD      0     0     0  # (Cyl.      0 -  18799)
c:  19539968         0     unused      0     0        # (Cyl.      0 -  19081)
Partitions should be created with offset 65, because sectors < than 65 sector are marked as readonly and therefore can't be rewritten.
Physical volumes can be created on any disk like device and on any partition on it we can use a or d on sparc64 c partitions. PV will label selected partition as LVM used and add needed information to it.
PV is created on char disk device entry. As any other disk operation in the NetBSD.
# lvm pvcreate /dev/rraid0a
For our example purpose I will create vg00 Volume Group. The first parameter of vgcreate command is Volume Group name and second is PV created on raid. If you later found that VG size is no sufficient and you need more space we will can add it with vgextend command.
#lvm vgcreate vg00 /dev/rraid0a#lvm vgextend vg00 /dev/rraid1a
Warning
If you add non-raid PV to your Volume Group your data are not safe anymore. Therefore you should add raid based PV to VG if you want to keep your data safe.
For our example purpose we will create Logical Volume named lv0. If you later found that LV size is not sufficient for you can add it with lvresize command.
Note
You must also resize the filesystem, when you resize LV, otherwise you will not see any filesystem change when you mount LV.
Warning
Be aware that to shrink LV you must first shrink the filesystem (and shrinking of FFSv2 filesystems is not supported yet as of NetBSD 9.0).
This means that for FFSv2 filesystems, the -L-* option is not available in NetBSD.
#lvm lvcreate -n lv0 -L 2G vg00#lvm lvresize -L+2G vg00/lv0
All lv device nodes are created in the /dev/vg00/
directory. File system can be create on LV with this command. After
filesystem creation LV can be mounted to system.
#newfs -O2 /dev/vg00/rlv0#mount /dev/vg00/lv0 /mnt/
For Proper LVM integration you have to enable lvm rc.d script,
which detect LVs during boot and enables them. You have to add entry
for Logical Volume to the /etc/fstab file.
# cat /etc/rc.conf
[snip]
lvm=yes
# cat /etc/fstab
/dev/wd0a               /       ffs     rw               1 1
/dev/vg00/lv0           /lv0/   ffs     rw               1 1
[snip]